Masuk tahun ni, dah 3 tahun straight aku main fantasy football ni. sebelum tu ada jugak la main game ni tapi on off la. dah sah-sah la kena tinggal punya kalau tak selalu update kan.
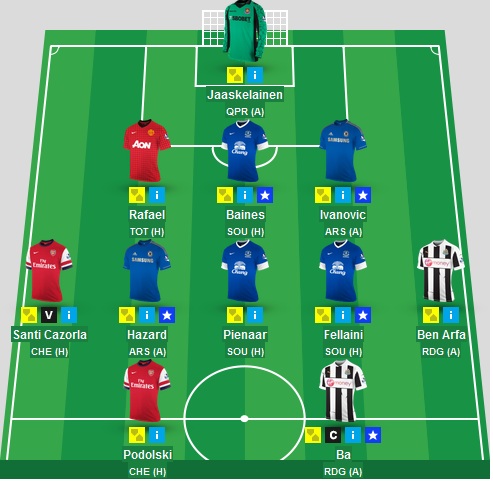
so hari jumaat mcm ni, biasalah..bila dah siap je keje semua, aku pun update la team aku. gameweek #5 minggu lepas mmg teruk la point team aku ni. siap dapat below average lagi. mmg hancus dan kena tinggal kaw-kaw dengan member-member yang lain. minggu ni aku setting team aku mcm ni. ok ke tak?
ok tak? minggu ni main striker 2 orang je sebab aku tersilap shopping midfielder! hehe..aku punya reserve striker Richie Lambert (Southampton) sebabnya aku rasa game lawan everton ni mcm susah je dia nak score.
ke korang rasa podolski yang takkan score? ni yang pening main fantasy football ni..!
Jumaat, 28 September 2012
Khamis, 27 September 2012
Masterchef Malaysia S2
Masterchef Malaysia S2 ni dah mula seminggu yang lepas. peserta pertama yang keluar si Addy yang aku rasa silap dia lebih pada penyediaan menu masa elimination round tu. bagi aku dia masak ok dan nampak kreatif la jugak untuk seorang pemain futsal.
| Shahida pun dah keluar |
Untuk yang masih ada kat Masterchef, selamat berjaya la korang...especially etiqa & ilaika..hehehe
Rabu, 11 Julai 2012
Photo Tutor: How to capture sunrise shot
On one beautiful morning, i manage to capture this picture. Beautiful sunrise at Ampang, Selangor

I love to capture this type of photo. With some post process in Photoshop, i was satisfied with the output in the end. Few tips i want to share on how to capture sunrise shot. I'm no expert, but more or less, this is what i always do before i take this kind of shot:
1. If possible, survey the area before you shoot. (where the sun rise/ fall, interesting spot, etc)
2. Tripod is essential. Small tripod like gorillapod will. (please consider you camera weight for optimum result)
3. Get on the ground early or you may miss the moment.
4. Filters like ND, GND and CPL will help you to get the best result.
5. Try to use smaller aperture opening to get the best DOF
6. Consider your foreground and background. Make it as clean as possible to avoid distraction.
7. Take a few test shot to get the best reading from your camera. (check for any under/ overexposed area so you can re-setting your camera)
8. Try to shoot in RAW to get the best result. (that is what i always do!)
I love to capture this type of photo. With some post process in Photoshop, i was satisfied with the output in the end. Few tips i want to share on how to capture sunrise shot. I'm no expert, but more or less, this is what i always do before i take this kind of shot:
1. If possible, survey the area before you shoot. (where the sun rise/ fall, interesting spot, etc)
2. Tripod is essential. Small tripod like gorillapod will. (please consider you camera weight for optimum result)
3. Get on the ground early or you may miss the moment.
4. Filters like ND, GND and CPL will help you to get the best result.
5. Try to use smaller aperture opening to get the best DOF
6. Consider your foreground and background. Make it as clean as possible to avoid distraction.
7. Take a few test shot to get the best reading from your camera. (check for any under/ overexposed area so you can re-setting your camera)
8. Try to shoot in RAW to get the best result. (that is what i always do!)
Labels:
ampang,
carl zeiss,
malaysia,
minolta,
Photography,
selangor,
slow shutter,
sony alpha,
sunrise,
tips
Selasa, 3 Julai 2012
Tamron 18-270mm f3.5-6.3 Di II PZD for Sony/ Minolta (Part 2)
I’ve done a test shot indoor and outdoor using this lens at selected focal length at their widest aperture. The picture was sorted starting from 18mm, 35mm, 50mm, 70mm, 100mm, 200mm and 270mm.
Indoor (shot done using a flash, bounced)
Generally, I think the sharpness of this lens is quite acceptable for each focal length.
Outdoor (shot not using flash, handheld)
The sharpness is well maintained although there might be some motion blur cause by camera shake since I’m not using tripod
Bokeh (shot not using flash, handheld)
Bokeh generated was quite ok. Please beware the effect of bokeh might vary since the factor of you foreground and background need to be considered. For my case, my background was quite far from the subject, so in theory, the bokeh should be easily obtained.
My verdict: This lens was quite versatile in term of range and the quality of the picture was not as bad for superzoom lens. Good for travel and for those who want to upgrade their kit lens. The Piezo Drive was surprisingly smooth and silent although the lens do hunting a bit in low light condition. With this Piezo Drive, i’m thinking of testing a Tamron 70-300mm f4-5.6 lens
Indoor (shot done using a flash, bounced)
Outdoor (shot not using flash, handheld)
Bokeh (shot not using flash, handheld)
My verdict: This lens was quite versatile in term of range and the quality of the picture was not as bad for superzoom lens. Good for travel and for those who want to upgrade their kit lens. The Piezo Drive was surprisingly smooth and silent although the lens do hunting a bit in low light condition. With this Piezo Drive, i’m thinking of testing a Tamron 70-300mm f4-5.6 lens
Tamron 18-270mm f3.5-6.3 Di II PZD for Sony/ Minolta (Part 1)
I manage to get a 1 day testing of Tamron 18-270 f3.5-6.3 Di II PZD lens for Sony/ Minolta mount. This lens should be the longest superzoom range ever made for Sony/ Minolta mount to date as it beat Sony SAL 18-250mm f3.5-6.3 by only 20mm.
And it comes with focus lock too. Very handy if you’re on travel
For comparison, it sits almost the same height with my Konica Minolta 17-35mm f2.8-4.0 lens, but at full length, the height was almost double from the original height. This lens has 62mm lens diameter, which is same as SAL 18-250mm f3.5-5.6 The aperture reading for this lens reads as follow:
18mm – min aperture is f3.5
24mm – f4.0
35mm – f4.5
50mm – f5.0
70mm – f5.6
150mm – f6.3
**end of Part 1. Wait for the second part; test shot using this lens.
Langgan:
Catatan (Atom)
